
Weighted blankets have been promoted recently as an item which can relieve stress, help calm the mind, relieve anxiety, chronic pain conditions, and conditions such as ADHD. It seems that the additional weight on the body acts in a similar way to being hugged. That action sends messages to the brain, that you are comforted and safe.
There are many places where you can buy a weighted blanket, at varying prices from around £40 to over £250. I once bought one through Amazon but had to send it back because the weight within the blanket was unevenly distributed – it was nearly all in the middle – and that is NOT good for you. If the weight is all on one area of your body, you will put too much pressure on one or more of your internal organs. The weight is produced by either plastic or glass beads sewn within pockets across the surface of the blanket. The ideal weight is approximately 10% of your body weight, so for a child that should be no more than 3-5KG, and for an adult between 5 and 8KG.
Why buy one when you can make one!?
In the end, I decided to make my own. I purchased some dark red fleece material – which is not the same colour nor texture of the blankets that you can buy, so I have my own customised preference. You can make one with your own choice of material, and make it larger, smaller, heavier, or lighter!
I bought 2 metres of the material, which was approximately 1.5m wide (or slightly wider – it has since stretched a bit, so my measurements may be off). I also purchased 5KG of recycled poly plastic pellets. I particularly wanted to use recycled material as much as possible. The plastic pellets will all be entirely hidden inside the pockets of the blanket, so the colour of them was irrelevant!
Step 1: Make a large pocket with long channels
To make the blanket, first I folded the material in half, to make it approximately 1m by 1.5m – so it’s the dimensions roughly of a small single bed, rather than the width of a double. I sewed around the 2 long edges and one short edge, leaving the top open making one large pocket. I then flipped it inside out, and then top-stitched again around those 3 edges, making a turned in reinforced edge. I used a zig-zag stitch throughout, to allow for any stretching of this material.
Remember to leave enough seam allowance at the open end to fold the edges completely inwards to complete the blanket. Not leaving enough room, will require you to unpick some of the stitching at the end, and to tidy up the edge after the fact.
Next, I measured out the width and length of the interior of the blanket, and divided it up into squares, marking it out with chalk. I sewed all the long lines first to make channels running vertically up the piece.

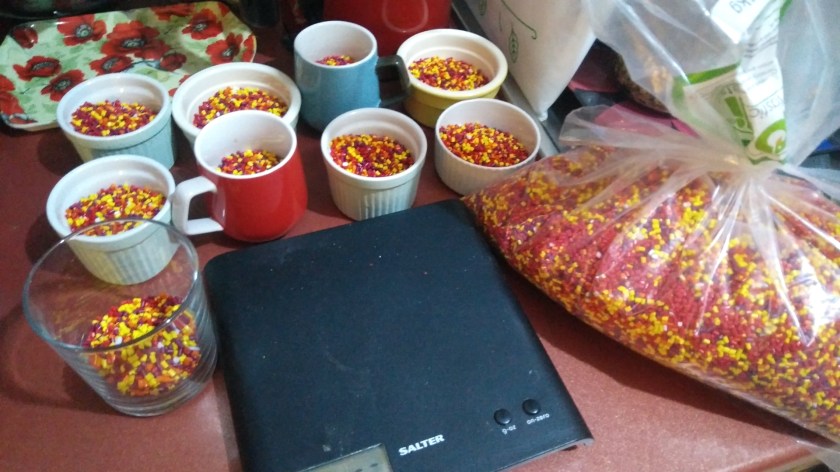
Step 2: Measure the squares and the amount of filling
Making a note of how many squares there will be for the finished blanket, I divided the 5KG of pellets into the weight that should go into each square. My blanket divided into 9 along the short side, and 13 along the long side, giving a total of 117 squares. 5KG, or 5000g, divided by 117 equals between 42 and 43 grams per square.
Step 3: Filling and sewing the rows
Using a long cardboard tube, I inserted one measured quantity of pellets into the bottom of each of the 9 long channels. Using the tube, I ensured that no pellets would stick to the inside of the channels further up – I needed the whole quantity to reach the bottom.
Making sure to keep the filling away from the chalked lines, I then took the blanket back to the sewing machine and sewed across to seal in the filling. It is vital that the plastic pellets stay at the bottom of the channel, not just to ensure the even weight distribution of the final blanket, but also to keep them away from the needle when sewing up the channels. Hitting a pellet with the needle, will likely break it. Luckily for me, I only accidentally broke 1 needle throughout this whole project!
Repeat the measuring of pellets, inserting them into the channels, and then sewing up the next row until you only have one row left. For me it got harder as time went on, because the weight of the blanket – obviously! – increased each time I had to sew up the next seam.
Step 4: The last row and edge seams
For the very last row, I kept all the measured pellets out to start with and then with the blanket set up at the sewing machine, inserted the pellets to the first square, made sure they were out of the way of the needle, folded the rough edge of the blanket inside itself, and completed the seam for that one square. Then I added the filling to the next square and completed the next seam. All the way to the very last square.
I lastly made sure that the seams for the vertical channels met the last edge seam to keep it tidy.
Finished!
Finally, I have my own custom (and considerably cheaper!) weighted blanket. The materials cost me roughly £35. The time it took to sew and measure was a couple of weeks on and off. Due to the item being so heavy, it is slow going toward the end. But I am super happy with the result.
Since making it, I’ve tried it out on the sofa and on the bed at night. I think I prefer having it as a lap blanket on the sofa rather than sleeping with it, as my anxiety is mostly when I’m awake! It is comforting when I’m sat watching the TV, reading, or doing my knitting and crochet. It is however cumbersome to lift up and down when you want to move around!
What do you think? As this was my first attempt, the seams are not particularly straight! The fabric had a degree of stretch, so keeping the lines and tension just right was quite difficult. But for me, it’s perfect. Homemade and rustic!


Well done!
LikeLiked by 1 person