

For any Fannibal (that is, fans of Bryan Fuller’s Hannibal TV series), a Flower Crown is essential head wear. For those not in the know, this relates to both the irony of putting flowers on characters who behave very very badly, and to Shakespeare’s Hamlet where Ophelia gives out flowers to all as she is being driven mad, and ultimately to her own demise; surrounded by flowers. Also, apparently, we nicked it from the One Direction fans (oh dear, oh dear!)!

There are strings of flowers you can buy for hair decoration, but if you want to go BIG, your best bet is to make your own. There are some examples on craft sites such as etsy, if you feel it’s too difficult… But I suggest giving it a go, you might surprise yourself!
The Flower Crown in the above photograph is an homage to the “Ravenstag” character in Hannibal. The Ravenstag is a metaphor for the mental state of Will Graham throughout the series. It’s a big black stag, with big antlers, and feathers…

If you don’t want to add the antlers, then you can still follow this tutorial and skip step 3. All of the other instructions are the same for creating a “regular” flower crown, use flower and colour combinations of your own choosing.
To make this crown, you will need:
- Pliers
- Hot glue gun
- Eye Protection (for dealing with the wire)
- Black spray paint (optional, see below)
- Wire, 2mm diameter. Enough length to go around your head twice, plus a bit more. Any colour, as it will be mostly covered. Or black or green if you want to leave some visible.
- Wire, of smaller gauge to bind around the antlers.
- Fake flowers: Roses, white and black (or in my case all white, plus a can of black spray paint!), other smaller white flowers of your preference. Choose those that have some nice leaves also.
- Real Deer Antlers… please don’t go poaching for these! I suggest eBay and other stores where you can obtain these from a legitimate source. The ones I had are Roe Deer Antlers, 15 cm (about 6 inches) tall. These were quite large, so I’d actually suggest getting slightly smaller ones that are easier to handle and position on the wire, and they’ll be lighter too.
- Ribbon, black or green to wrap the band and both colours for optional tassels.
To make the Flower Crown:
1. Prepare the Flowers
If you need to spray paint some of your white roses black, make sure you have a well protected area in which to apply the paint. Watch your clothing! Take the heads off a select few of the roses, I painted 4, but only ended up using 3 blacks in the finished crown. Use sticky tape to secure them to a board or table cover before giving them a few bursts from the spray can. Take it slow, build up the paint in small bursts from all angles until you are happy, then leave to dry in a well ventilated area. When dry, put the heads back on the stems.
Cut the fake flowers up: Cut each rose at the base of the wire stem, so that you have long-ish lengths to wrap around the crown. Select two or three stems with leaves only and cut these with stems also.
For the smaller flowers, either pull off existing detachable stems of small flower clusters (as mine had) or cut them in the same way as the roses, with small stems to allow for wrapping. Take a few leaves as well if you like the way they look.

2. Shape the Wire Head Band
First, loosely wrap the 2mm wire around your head to get the base size for the crown. Leave a little room, as the crown will become bulky after you’ve added the flowers. Do not cut the wire at this point, when you’ve got the right size, twist the ends together and then begin to wrap a second band of wire around the first, closely to the original circle. When you get back to the join, cut the wire leaving a little to bend the ends over. Use the pliers to bend both the ends of the wire over to ensure the pointy ends are covered.
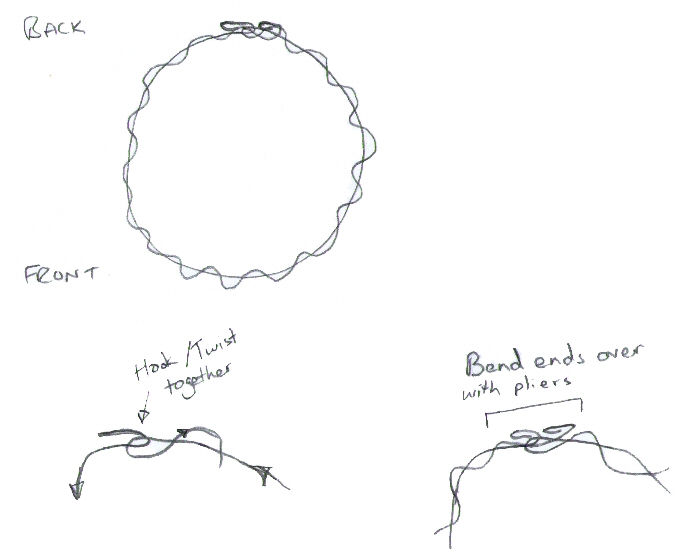
Always assume that the join in the wire is to be the BACK of the crown.
3. Positioning and Wiring the Antlers.
This is actually the most difficult part, and the antlers will NOT remain stable until you actually start wrapping the flowers around in the following steps. Don’t worry if they fall over all the time (mine certainly did!). We just need to get them in the right position on the band.
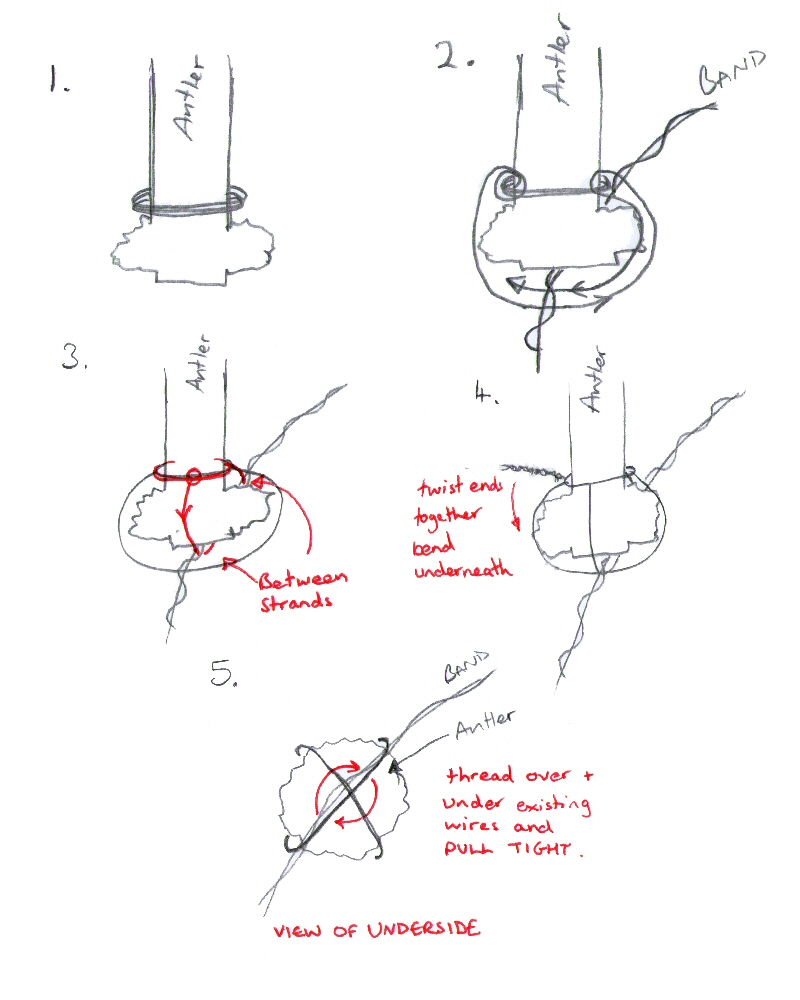
Put on eye protection! Place the wire band on your head, and look in a mirror whilst holding the antlers up to find the right position for you – note which is the proper left and right of the antlers, they naturally curve inwards with the points facing outwards. When you’re happy, mark the points on the band with the pliers – make a scratch or dent for each position. Take the wire off your head, and begin to make a cage for the bottom of the antlers with the smaller gauge wire as follows:
The base of the antlers usually have large “knobbly” bits from where it grew out of the deer’s skull. This area is what we surround with the small gauge wire to create a base to attach to the main wire band. Make sure you wear your eye protection – as this gets fiddly and I was very glad to have some goggles to wear myself. Use the pliers to help you pull the wire tight, when wrapping over and under. The image under the descriptions of the steps should help clarify what I mean.
- Begin by leaving a 5 cm (2 in) end and then wrap the wire around the base of the antler, just above the “knobbles” 3 or 4 times.
- With the end at the side of the antler, wind the wire around the first 4 wraps to hold it’s position, and then holding the antler at the correct mark on the wire head band continue wrapping the wire under the antler, under the headband, and up to the other side of the antler, wind the wire around the first 4 strands again on this side, and go back under the headband to the other side. Do this 2 or 3 times.
- Wrap the wire once more around the antler as you did at the beginning, and then again wrap around and under the wire, this time 90 degrees from the wraps made in step 2 AND between the two strands of the main headband. You’ll need to cut the wire before threading through the two strands and leave enough length to wrap 2 or 3 more times.
- Bring both ends together, twist together and hide the end underneath the antler.
- To tighten the structure a little make sure it is in the correct position on the head band and with a new piece of small gauge wire, underneath the antler wind it over and under each of the wire strands and the headband around in a circle. Use the pliers to pull this as tight as possible, creating tension between our wire “cage” and the headband. It still won’t be very stable, but this will change once we add more bulk to the rest of the crown.
- Repeat steps 1 to 5 for the other antler.
4. Add the Flowers to the Crown
Starting from the front centre, choose your first rose, and thread it in between the two strands of the headband, bend the wire to position the bloom in the right place. Wrap the stem of the rose around the head band (not between the strands) and then when you get to the end of the stem, poke it between the strands to lock it in place. You can choose either direction to wrap the FIRST flower, but from then on, always wrap the flower stems on the right to the right, and left to the left. Continue to add a few large flowers at the front and on either side of the antlers, then swap to the smaller flowers. You can wrap flowers all the way around if you like, my crown here has no flowers at the very back.
Always insert the flower between the strands of the headband first, then wrap the stem around the outside of the headband, over/around any previous stems already added, and around the underneath of the antlers, and then insert the very end between the strands of the headband.
Bend the flowers to get them to all point in the correct directions, and adjust as necessary. After adding the flower blooms, do the same with any leaves strands that you prepared earlier. Fill in any obvious gaps, and if the antlers are still a little loose fill in space around them with the leaves.
Check for any stems which are too long and may leave pointy ends which will be uncomfortable, trim these off if required. Finish off by using the hot glue gun around all of the ends of the stems, along the inside of the headband, and where any parts of the flowers look like they may fall apart. Leave until the glue is set.
5. Ribbon Wrap of Head Band and Optional Tassels
With a long length of ribbon, if possible use a single piece, begin at the back of the head band, begin to wrap around the wire and stems, leaving the blooms and leaves visible. Wrap the ribbon over itself leaving no gaps if possible and wrap tightly around all the ends of the stems, pulling them closer together and making the head band more comfortable to wear. As you reach the base of each antler, go around it once or twice in a figure eight, to ensure it is completely covered and blends in with the rest of the head band, continue to wrap tightly all the way around until you reach the start (at the back). Cut the ribbon and fix the ends in place with hot glue.
Optional Tassels: Simply cut lengths of ribbon and tie them at the very back of the headband. I like to add a couple of tassels to ensure the ends of the ribbon wrapped around the head band stay in place.

6. Put the Flower Crown on and practice not knocking things over or scraping the walls with your antlers around the house!
The wire headband should be nice and malleable, so that when you put it on, you can adjust its’ shape to comfortably fit your head. The bigger the antlers, the heavier the crown, so you’ll need to practice wearing it!
I hope you’ve enjoyed reading and trying this tutorial. I’d love to see what you come up with, please leave comments and send me pictures! If I get a few responses, I’ll put them up on a subsequent post for you all to see!
Go forth and be creative! X


